iSextant
Privacy policy
If
you are reading this then you are either interested in how
astro-navigation works from a traditional point of view or perhaps
there has been a solar flare that has disrupted GPS and your manual
navigation has suddenly become a necessity. It is recommended that
you print these instructions so you can read them offline.
Either
way iSextant aims to make sun sight astro-navigation as easy as
possible.
IMPORTANT
Astro-navigation is for use in the open sea out of sight of land,
when in sight of land coastal navigation is the more accurate method,
you use iSextant entirely at you own risk!
IMPORTANT
Never look directly at the sun with the naked eye and especially
never through optics. Always use the recommended filters on your
sextant. (You will never get a good reading with unfiltered /
unshaded sun anyway)
The
following is a step by step guide on how to use iSextant.
1.
Before you being you'll need a rough idea of your current position.
Almanac based astro-navigation usually uses the nearest whole degree,
i.e. 51°10'.50N
, 001°35'.50W
would become 51°00'.00N
, 002°00'.00W.
iSextant can handle both depending on your chart, but the latter is a
bit easier to plot. This point is your datum from which you'll
measure your position, referred to as assumed position or AP.
2.
Use a real Sextant to measure the height of the Sun please see
http://en.m.wikipedia.org/wiki/Sextant
on how to do this. It is important to get the index error at this
point and keep a note of it. As soon as you have the sight it is
important to get the exact time. This is best done with a watch
rather than the iPhone itself. (because it is difficult to adjust the
exact seconds on an iPhone)
|
3.
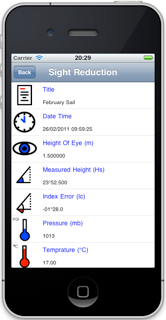
Now you have your reading open iSextant on the iPhone and add a
new reading with a title relevant to the trip or reading.
4.
Select the date and time and press the now button this will set
the reading to the iPhone's time. You can then adjust this to the
more accurate time you noted from your watch. (don't forget every
4 seconds time error is an extra nautical mile.)
5.
Fill in all the details on the table, height of eye, current
pressure and temprature. (the height of eye being the most
important to get correct here as it has a significant effect.)
|

|
|

|
6.
Transfer the reading from the Sextant into the Measured height
field.
Transfer
the index error you noted in stage 2.
7.
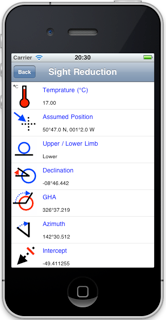
At this point you'll need the Assumed position, this is the rough
value that you decided upon in step 1. Add this in.
8.
Select upper or lower limb depending on the reading from 2.
9.
The App will calculate 4 values, declination, GHA (these are for
reference only) Azimuth and Intercept (these are the values we use
to plot)
|
10.
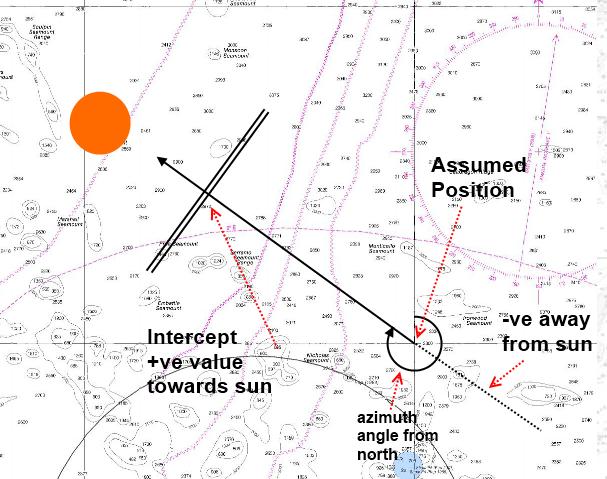
The azimuth is the true bearing of the Sun from the assumed position,
we normally draw this on the chart as a single line drawn through the
AP and the bearing being the azimuth angle from north (same as a
normal bearing) it is draw through the AP as the intercept can be
either side of thevAP.
11.
The intercept is the distance in nautical miles from the AP point
that your position line is. This is drawn as a perpendicular line to
the azimuth line either towards the sun if positive or away from it
depending on if the intercept is a negative value. Our position is
somewhere on this line, we'll call this the intercept line.

12.
This is a 1 point fix. The double line drawn above is actually a tangent of a huge imaginary
circle on the earth surface, your position is somewhere on this
circle. If this whole line is subsequently moved as a running fix
(based on DR and tides). We can then follow the same process again
some time later (30min after the sun has moved) You can use the same
or different AP this time. but this time we'll have a new intercept
line which will cross our running fixed intercept line. This is our
approximate position.
Naturally
the more you repeat this procedure not forgetting to move your
position based on boat movement, the more accurate your position will
become.
Good
Luck and enjoy.
Link
to App Store:- iSextant
App
For
more information on HydrogenSC production please visit:-
http://www.hydrogen-software-consulting.com/
For support please email info@hydrogen-software-consulting.com
For
well priced Sextant:- Davis
Mark 3 Sextant


